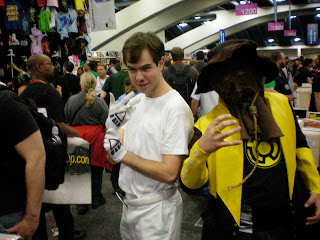
That title is way too long, so I've been saying "Scare-tro" or "Sines-crow" cuz' I'm hella clever.
WonderCon fun!
Me-ow!
All you WonderCon attendees be on the lookout for this monster and snag some pics for me! (I doubt the pooch will be at the con.)
The process.....
So, the Scare-tro wearer had this coat that he thought would be a good base for the coat. As you can see it has a lot of extra bells and whistles on it, but I tore those off easily.
The coat also needed to be shortened, made space for the yellow vinyl and the color needed to be changed!
I removed the sleeves, and marked where the new seam will be.
I cut the sleeves down to size (the vinyl will be added in like 5 more steps) and stitched the edges so the fabric would not unravel.
I marked the sections on the coat that would be cut away and stitched the edges.
I removed the hardware as I went along.
I soaked the coat in bleach, which faded the color. I also used something called discharge paste, it is a solution that is used to remove dye from natural fabrics. You apply the discharge paste, sometimes watering it down to really let it soak into the fabric. When it has dried you steam the fabric and the dye magically disappears! It is hard to predict the outcome, but I wanted the color uneven and rough looking.
The color was yellowish from the discharge paste, and kind of an orange/beige color from the bleach. Next, I dyed brown all the coat pieces, and the additional piece of beige I purchased to make the hat.
Next, onto the yellow vinyl!
I cut out all the pieces carefully. The vinyl I use has a knit back that is ease to draw on, since it is not good to pin on vinyl.
I used strips of vinyl to make up the lower sleeve, because that's what the yellow corps outfit looks like.
The strips sewn together.
I also added reflective fabric for increased awesome-ness.
I added zippers to the inner arm so it would fit onto human arms.
Stitched the lower sleeve to the upper sleeve.
Assembled the upper coat parts.
Stitched the upper coat to the lower.
The back completed. The original coat was a little bit snug across the back, so I added a gusset into the upper back of the vinyl, because that fabric has virtually no give.
On to the freakin' creepy mask.....
I used my trusty styrofoam head as a model.
I cut a large square of uber-rough burlap and draped it over the head.
I used my trusty ol' noose to hold the basic outline of mask in place.
I adjusted the burlap until it was to the fullness that I wanted, and trimmed some of the extra. I used masking tape to mark out the area of the face.
I cut open the mouth hole and stitched it up roughly. It's creepy, and allows the wearer to breathe a bit easier. I hand stitched it all with embroidery thread.
I used muslin to make an under-mask lining, because that burlap would really cut up one's face!
I tacked the lining to the burlap to hold the whole thing together.
I cut out the eyeholes with terror. The thing got scarier by the minute and it was terrifying having this thing on my work table. I was glad to get it out of the house!
We can't forget his hat. I made it rather large to make sure it would fit comfortably over the mask. I also had to trim down the brim of the hat several times. It started out giant like an old lady's sun hat! I also added some raffia for hair, I know it's not accurate, but what's a scarecrow without the option of hay hair?? It's on a separate band that can be removed if desired.
This is the belt, but I am going to make a silver one when I find the right color vinyl.


I don't know about annyone else, but I got scared!
ReplyDeleteIMHO, the master touch was the hanging hope in the neck. It keeps the "hood" tight, is simple, light, and stylish. But all the rest is no less than incredible. Congrats³ again and again, Gina.